1. Introduction
1.1. What can cloudworx.compose do?
Advantages of cloudworx.compose:
- Creation of documents with data from Salesforce
- Dynamic document templates for automatic, individualised adaptation of documents
- Dynamic embedding of logos and images
- Dynamic attachment of additional (PDF) documents to the main document
What documents can be created using cloudworx.compose?
| - | Source format | Target format |
|---|---|---|
| Tables | xls, xlsx, ods | xls, xlsx, csv, ods, pdf |
| Text editing | doc, docs, Odt | docx ,rtf,odt,pdf |
| Text editing (plain text) | txt | txt, pdf |
| HTML (template must be hosted by cloudworx | HTML |
1.2. The cloudworx.compose interface
| Tabs | Description |
|---|---|
| Configurations | This tab is used to configure the application. In a single data record, authentication against cloudworx is performed here. In addition, further settings relating to the entire Salesforce organisation can be made here. |
| Templates | This is where you enter all the information needed to create a predefined document. All documents created using a template use these settings. This is therefore the template configuration. All objects listed below (scopes, field automations, etc.) refer to one template each. |
| Scopes | Scopes determine which data records are to be used to create a document. At least one parent scope must be defined that maps the Salesforce ID of the source data record. In scopes, you can also specify whether existing (PDF) files in referenced data records should be attached to the document to be created. |
| Field Automations | Field Automations can be used to fill or change fields in Salesforce either before or after the document is created. A Field Automation always refers to one of the scopes created in the template. The specified field is updated or filled in all records of the specified scope if the condition stored in the Field Automation is correct. The condition and the value to be written can be entered as a fixed value or as a merge field. |
| Template Relations | Template Relations can be used to attach additional documents from other templates to the document being created, either before or after the main document. To do this, a scope must be entered that serves as the source record for the subordinate template. |
| Attachments | Simple PDF documents can be inserted here. The attachments are appended to the document in the order specified. |
| Images | Images can be stored here as Salesforce file IDs or URLs so that they can be referenced in the document via merge fields. |
| Calculation Results | Only relevant if the target format is “xls” or “xlsx”. Data from Excel cells can be read after the document has been created and saved in Salesforce. |
| Results | After each successful or failed document creation, a result record is generated. This contains the ID of the record from which the document creation was started, the time of creation and the status (‘Success’ if the document was created successfully) of the document creation in the ‘Message’ field. |
2. Requirements
To install cloudworx.compose, you need Salesforce in the Enterprise, Performance, Unlimited or Developer Edition, which is API-enabled. Your user must also have administrator rights.
3. Installation and Setup
3.1. Installation
cloudworx.compose is installed via AppExchange or using a link provided by cloudworx.
- When you are on the installation page, select ‘For administrators only’. You can assign rights to other users later via permission sets.
- Go to “Install”.
- Tick ‘Yes, allow access to these third-party websites’ so that cloudworx.compose can communicate with our server.
 X
X
Once your installation is complete, you will find all components associated with the package in your organisation. You can recognise them by the namespace prefix ‘cwcp’.
You may receive a notification stating, ‘Installing this application may take some time.’ If this is the first time you have seen this message, don't worry. Just click ‘Done.’
3.2. Setup
Once installation is complete, we recommend checking the installation in the ‘Applications’ section under ‘Installed Packages’ in Salesforce Setup.
 X
X
First, we must assign the usage rights for cloudworx.compose. Use of the application requires that certain rights be assigned to the desired Salesforce users. A basic distinction is made here between the type of use desired:
- cloudworx.compose Admin: for complete management of the application
- cloudworx.compose User: required for creating documents
- To do this, search for ‘Permission sets’ in the setup.
- Search the list for ‘cloudworx.compose Admin’ and ‘cloudworx.compose User’ and click on the set of permissions you want to assign to a user.
- Go to ‘Manage assignments’ and add the desired users by selecting the checkbox.
4. Configuration
The first step in configuring the application is to create a configuration data set:
1) Search for the ‘cloudworx.compose’ app in the app launcher.
 X
X
2) Then go to the ‘Configurations’ tab. You now need to create a data record to store the configuration parameters. To do this, click on ‘New’ and enter the relevant information. We will explain exactly what this is in a moment.
 X
X
Let's take a closer look at the fields.
| Deactivate (checkbox) | This checkbox allows you to deactivate cloudworx.compose for this Salesforce organisation, regardless of the assigned permission sets. If this checkbox is selected, no more documents can be created via cloudworx.compose. |
| CSV separator | Here you can set which character should be used as a separator in CSV files. This setting applies to all CSV documents created via cloudworx.compose in the Salesforce organisation. If you are unsure what to set here, ignore this field. |
| Error Email Address | If an error occurs while creating a document, a description of the error will be sent to this email address. Only a single email address can be entered here. |
3) Fill in the required fields. You will now be redirected to the page of the configuration record you just created.
4) In the new Configuration record, click on ‘Authenticate’ to connect to the cloudworx server. If your authentication was successful, a window with the following content will open:
 X
X
5. Creating a Template
To create a document via cloudworx.compose, you need to create various data sets:
Required:
- Template: Container for the actual file template and additional settings
- Scope: Defines which data records are to be taken into account when creating documents and which files in these data records are to be attached to the document.
Additionally available:
- Field Automation: Configuration of automatic updates to fields before or after document creation
- Template Relations: Relationships between different templates. Templates that are linked via a template relation are combined when the document is created (only for PDF target documents).
- Attachments: Attachments that can be added to the generated document (only for PDF target documents)
- Image: URL or Salesforce ID of an image file that can be added to the document
A template data set can be created either via the Configuration or via the ´Templates´ tab. In this example, we will create a template via the ´Templates´ tab.
The ‘Templates’ tab allows you to view all templates in the system. Of course, you can also filter these as you are accustomed to doing with other Salesforce objects.
To create a new template, click on the ‘New’ button. The dialogue box for creating a new template record will open.
 X
X
The following fields must be filled in here:
| Field | Description |
|---|---|
| Name | This is the name of your template. You can use it to distinguish between your templates. The name is only visible and relevant to you as the administrator. |
| Configuration | Here you enter the configuration you created in the previous step. There is always only one configuration data record. |
| File Name Format | Here you enter the desired file name. You do not need to specify the file extension (e.g. ‘.pdf’). After you have created scopes in your template, you can also adjust this file name dynamically. For more information, see: cloudworx merge fields. |
| Create Asynchronously | For the creation of very large documents, it may be useful to create the document asynchronously. This means that document creation is delayed: After triggering the creation process (e.g. by clicking a button), the process is executed in the background. The document is not available immediately, but only after some time. Asynchronous document creation is necessary if the creation of a document is expected to take longer than 2 minutes. Selecting this function results in the following restrictions:
|
| cloudworx Id | The cloudworx Id is automatically generated when the template record is created and does not need to be filled in here. |
Example of a use case:
You want to create a PDF file for each of your customers (accounts) listing all of that customer's employees (contacts).
You also want to display a list of all products from Salesforce in this document.
The document is created via a button in the respective account record.
Enter the following information in the fields:
- Name: Customer information (from accounts)
- File Name Format: Customer information
 X
X
6. Scopes
A scope data set is always assigned to a specific template data set.
Scopes define which data records are taken into account for this template. They refer to the data structure of the respective Salesforce Org*. Scopes can also be used to dynamically adjust the file name of the document to be created. Scopes are also the basis for field automations.
In a nutshell, it helps to illustrate everything:
A scope can contain a single data record or a list of data records. From this data record or list, further lists of data records can be called up, which either consist of sub-objects or parent objects of data records from the original list. In addition, lists of unrelated objects can also be created. Further lists can be called up from these lists, and so on. Each list can also be sorted and filtered so that only certain data records appear in the list. In addition, files can be queried from all data records in each list, which can also be sorted and filtered.
A scope is always defined based on one (for field scopes) or more (for free and list scopes) Salesforce records. All standard and custom fields* from records that are available via a scope in a template can be inserted into the document template (e.g. the Word document).
Please note:
A template must always contain at least one (primary) scope in order for a document to be generated.
There are two methods for creating scopes: simple mode and advanced mode. In simple mode, scopes can be created using an input mask. However, the settings options are limited in this mode. After creating a scope in simple mode, it can still be adjusted. Simple mode is a quick way to create simple scopes and is recommended by cloudworx.
6.1. Creation of scopes (simple mode)
6.1.1. Creating primary scopes in simple mode
In the template data set, a primary scope can be created simply by clicking the 'Create Primary Scope' button.
A primary scope defines which data set is to be the source data set.
The mask that opens after clicking on the button displays all objects available in the Salesforce Org.
The checkbox on the left-hand side can be used to select which of these objects should have a primary scope created for them.
The name of the scope in the column with the heading 'Name' defines the name of the scope, which may differ from the object name (more information on why this is useful in some cases is provided in the description of the advanced mode). The label of the object is displayed here by default.
The name entered here is used to create merge fields in the document.
The 'Get Attachments' checkbox can be used to select whether files found in files via the scope should be attached to the document to be created.
Please note:
The scope name must not contain any spaces.
The selected scopes are created by clicking the 'Create' button.
The 'Back' button navigates back to the template data record without creating any scopes.
6.1.2. Creating child scopes in simple mode
In a scope data set, you can use the 'Create Child Scopes' button to create additional field and list scopes that are subordinate to the current scope.
The input mask that opens after clicking on the button is divided into two areas: Field and List. The difference between these is described in the following points.
The selected scopes are created by clicking the 'Create' button.
The 'Back' button navigates back to the current scope data set without creating any scopes.
6.1.2.1. Creating field scopes in simple mode
In the 'Field' area, you can create scopes that refer to a lookup relationship that exists in the object of the current scope.
Example:
A contact has a lookup relationship to an account.
All lookup relationships that exist in the object of the current scope are displayed here. If a field scope is to be created for this lookup relationship, the checkbox in the left column must be activated.
The name of the scope in the column with the heading 'Name' defines the name of the scope, which may differ from the object name (more information on why this is useful in some cases is provided in the description of the advanced mode). The label of the object is displayed here by default.
The fourth column, labelled 'Parent Field Name', displays the name of the field through which the lookup relationship exists. This should not be changed, otherwise the relationship cannot be established.
The 'Get Attachments' checkbox can be used to select whether files found in files via the scope should be attached to the document to be created.
6.1.2.2. Creating list scopes in simple mode
Unlike field scopes, list scopes do not refer to objects that are linked to the object of the current scope via lookup relationships. Instead, they are used to create scopes of objects that themselves have a lookup relationship to the object of the current scope.
Instead of containing only one data set, as is the case with field scopes, list scopes can contain more than one data set.
Example:
A list scope from an account therefore contains, for example, all contacts in that account.
The mask that opens after clicking on the button displays all objects that have a lookup relationship to the object in the current scope. The required scopes can be activated using the checkbox on the left-hand side.
The name of the scope in the column with the heading 'Name' defines the name of the scope, which may differ from the object name (more information on why this is useful in some cases is provided in the description of the advanced mode). The label of the object is displayed here by default.
The name of the section is defined in the fourth column with the heading 'Section Name'. This is required when creating the document to define when merge fields from this scope should be displayed: The document defines when a section starts and when it ends. Between the start and end, merge fields from the scope with the section name can then be queried and displayed. For more information, see the 'Merge fields' section.
The 'Get Attachments' checkbox can be used to select whether files found in files via the scope should be attached to the document to be created.
6.2. Creation of scopes (advanced mode)
To create a scope, click on the 'New' button in a template. Here you can select the type of scope you want to create:
 X
X
| Field | A field scope references a maximum of one data record. The primary scope must be a field scope. (Example: an account) |
| Free | A free scope can contain multiple data records. These data records do not need to be connected to any of the field or list scopes. (Example: all products in Salesforce) |
| List | A list scope can contain multiple data records. It is dependent on another scope. (All contacts below the account defined in the field scope) |
6.2.1. Field Scopes
A template must contain at least one field scope. This field scope defines the data record that serves as the starting point for document creation. This is known as the primary scope.
Please note:
Primary scopes differ from subordinate field scopes in that the 'Parent Field Name' field in the parent scope does not contain the name of the lookup relationship* field from the object in the parent scope, as there is no parent scope here. Instead, it always contains a field name from the current object (stored in the 'Object Name' field). In most fields, this is the 'Id' field.
 X
X
The following fields are available in a Field Scope:
| Field name | Description |
|---|---|
| Name | Mandatory field. The name of the scope should identify the respective object at first glance. It is also required in the document for the merge fields. It must not contain any spaces. Since the scope name does not have to correspond to the object name, it is possible to have multiple scopes in the same template that refer to the same object. For example, an account that contains customer data and an account that contains supplier data. |
| Parent Scope | The scope that is higher than this scope. If there is no higher scope, the current scope is a parent scope. |
| Object Name | |
| Template | The template record to which this scope refers (lookup relationship). |
| Parent Field Name | The name of the field from the parent scope object to which this scope refers. If the current scope is a parent scope (i.e. has no parent scope), this field refers to the record from which the template is called. |
| Get Attachments | If the checkbox is selected, the files linked to the records found via the scope are also retrieved from Salesforce. These are then displayed in a mask for selection when the document is created manually and attached to the document to be created (only relevant for PDF documents). |
| Attachment Preselect Count | If a number is entered here, this number of files will be activated for the attachment. During manual creation, this selection can be deselected again for each file in the creation mask. During automatic creation, these files will be attached (if possible). |
| Attachment Filters | Here you can filter (via SOQL) which conditions a file must meet in order to be displayed. For example, you can check whether the file has a specific file name. Please note: The files are searched for using the Salesforce object 'ContentDocumentLink'. If you want to filter by file name, the content of the field should be, for example: ContentDocument.Title LIKE '%Filename%' |
| Attachment Order | The order of the files can be controlled using this field. For example, if you enter a date field from the respective object, the files will be sorted based on this date. The commands 'DESC' (descending) and 'ASC' (ascending) then determine the order. Please note: The files are searched using the Salesforce object 'ContentDocumentLink'. If you want to sort by the creation date of the file, the content of the field would be, for example: ContentDocument.CreatedDate DESC |
| Attachment Limit | Determines how many files are displayed. If, for example, 1 is specified, only the first file found is displayed and can only be added as an attachment. |
Example of a Use Case:
For your list of employees, clerks and products, you must first create a primary scope.
Since you want to create the document using a button in the account, this object is your starting point:
 X
X
Please note that the name of the scope does not have to match the name of the object.
6.2.2. Free Scope
A free scope can contain records that are not linked to a field scope record or to the records of a list scope via lookup relationships.
 X
X
The Free Scope contains the following fields:
| Field name | Description |
|---|---|
| Name | Since the scope name does not have to correspond to the object name, it is possible to have multiple scopes in the same template that refer to the same object. For example, one scope for all active products and another scope for all inactive products. |
| Parent Scope | The scope that this scope is a parent of |
| Object Name | |
| Template | The template record to which this scope refers (lookup relationship). |
| Section Name | Since this scope can contain more than one record, a section name must be defined. In the document, this section name is then used to indicate that data from this scope should now be output. |
| Query Filters | For filtering the results. Only the data records that match the filter entered here are included in the scope. For example, you can filter by status. The filters can also contain merge fields that reference other scopes. All scopes from the respective template can be used here, except if the scope is a scope subordinate to the current scope. |
| Query Order | Specifies the order in which the data records appear in the scope. This allows sorting by creation date, for example. |
| Query Limit | |
| Get Attachments | If the checkbox is selected, the files linked to all records found via the scope are also retrieved from Salesforce. These are then displayed in a mask for selection when the document is created manually and attached to the document to be created (only relevant for PDF documents). |
| Attachment Preselect Count | If a number is entered here, this number of files will be activated for the attachment. During manual creation, this selection can be deselected again for each file in the creation mask. During automatic creation, these files will be attached (if possible). |
| Attachment Filters | Here you can filter (via SOQL) which conditions a file must meet in order to be displayed. For example, you can check whether the file has a specific file name. Please note: The files are searched for using the Salesforce object 'ContentDocumentLink'. If you want to filter by file name, the content of the field should be, for example: ContentDocument.Title LIKE '%Filename%' |
| Attachment Order | The order of the files can be controlled using this field. For example, if you enter a date field from the respective object, the files will be sorted based on this date. The commands 'DESC' (descending) and 'ASC' (ascending) then determine the order. Please note: The files are searched using the Salesforce object 'ContentDocumentLink'. If you want to sort by the creation date of the file, the content of the field would be, for example: ContentDocument.CreatedDate DESC |
| Attachment Limit | Determines how many files are displayed. If, for example, 1 is specified, only the first file found is displayed and can only be added as an attachment. |
Example of a Use Case:
Your document should list all products that exist in Salesforce. Since these products are not linked to your account or the contacts under that account, you will need a Free Scope.
Your company offers four different products. However, one of them (product 3) is no longer produced and is therefore inactive. You do not want to list this product.
You also want to list all products alphabetically in descending order by product family.
You create a Free Scope with the following values:
 X
X
For descending order, "Family DESC" must be entered in the query filter. The query limit must be left blank, as you want to display all active products.
6.2.3. List Scope
A list scope contains records that are linked to a record from the parent scope.
 X
X
The list scope contains the following fields:
| Field name | Description |
|---|---|
| Name | Since the scope name does not have to correspond to the object name, it is possible to have multiple scopes in the same template that refer to the same object. For example, one scope for all active products and another scope for all inactive products. |
| Parent Scope | The scope that this scope is subordinate to |
| Object Name | |
| Template | The template record to which this scope refers (lookup relationship). |
| Related List Name | This is the theme list name* of the lookup link. For custom objects, this always ends with '__r'. The Related List Name can be viewed in the Object Manager via the respective lookup link. |
| Section Name | Since this scope can contain more than one record, a Section Name must be defined. In the document, this Section Name is then used to indicate that data from this scope should now be output. |
| Query Filters | For filtering the results. Only the data records that match the filter entered here are included in the scope. This allows you to filter by status, for example. The filters can also contain merge fields that reference other scopes. All scopes from the respective template can be used here, except if the scope is a scope subordinate to the current scope. |
| Query Order | Specifies the order in which the data records appear in the scope. This allows sorting by creation date, for example. |
| Query Limit | |
| Get Attachments | If the checkbox is selected, the files linked to all records found via the scope are also retrieved from Salesforce. These are then displayed in a mask for selection when the document is created manually and attached to the document to be created (only relevant for PDF documents). |
| Attachment Preselect Count | If a number is entered here, this number of files will be activated for the attachment. During manual creation, this selection can be deselected again for each file in the creation mask. During automatic creation, these files will be attached (if possible). |
| Attachment Filters | Here you can filter (via SOQL) which conditions a file must meet in order to be displayed. For example, you can check whether the file has a specific file name. Please note: The files are searched for using the Salesforce object 'ContentDocumentLink'. If you want to filter by file name, the content of the field should be, for example: ContentDocument.Title LIKE '%Filename%' |
| Attachment Order | The order of the files can be controlled using this field. For example, if you enter a date field from the respective object, the files will be sorted based on this date. The commands 'DESC' (descending) and 'ASC' (ascending) then determine the order. Please note: The files are searched using the Salesforce object 'ContentDocumentLink'. If you want to sort by the creation date of the file, the content of the field would be, for example: ContentDocument.CreatedDate DESC |
| Attachment Limit | Determines how many files are displayed. If, for example, 1 is specified, only the first file found is displayed and can only be added as an attachment. |
Example of a Use Case:
Your document should list all contacts in the account. Since these contacts are linked to the account via a lookup, you can use a list scope for this.
So you create a list scope with the following values:
 X
X
No query filters are required because we want to list all contacts.
7. Field Automations
Field automation can be used to update a field after or before a document is created. Whether an update takes place can be controlled by a condition in the field automation.
The scope defines in which data record or data records this field to be updated is located.
The following settings can be made in Field Automation:
| Field name | Description |
|---|---|
| Template | Mandatory field. Reference to the template in which this field automation is located |
| Name | Mandatory field. Name of the field automation. This is only used by you to distinguish between different field automations |
| Scope | Mandatory field. The scope to which this field automation refers. Updates are limited to data records that are within this scope. |
| Update Before Document Creation | If a field is to be updated before the document is created, this checkbox must be selected. This is useful, for example, if you want to display the updated value of this field in the document. If this field is activated in at least one of the field automations of a template, the document is always created asynchronously. This means that the document is not immediately available when the creation window closes. |
| Field Name | Mandatory field. The API name of the field to be updated. |
| Operator | If you want to check whether the condition for the update is met before updating, you must set an operator. |
| Condition Value | The value to be checked. The field referenced in Field Name is always checked. Using Salesforce merge field logic, another field can be referenced here instead of a fixed value. However, this must be in the same scope as the Field Automation. |
| New Value | Mandatory field. The new value of the field. Using Salesforce merge field logic, you can reference another field here instead of a fixed value. However, this must be in the same scope as the Field Automation. |
Example of a Use Case:
You would like to update two fields in your document containing customer information:
Enter the current date in the custom field 'Customer information creation date' (API name: Customer_Information_Created_Date__c) in the account. This should also be displayed in the document.
In the custom checkbox field 'Listed in customer information' (API name: Listed_In_Customer_Information__c) in the contact, you want to tick the contacts that you list in the document.
So you need two field automations:
First field automation:
 X
X
'Update Before Document Creation' must be enabled because we also want the date to be displayed in the document.
'Condition Value' is empty because we always want to enter the current date in this field when we create a document.
The 'New Value' field contains 'System.today()'. This enters the current date.
Second field automation
 X
X
8. Calculation Requests
Calculation requests can only be used if the target format is an Excel table.
Data from this table can be read and stored in Salesforce.
For example, if a calculation is performed using a formula in an Excel table, the result of this calculation is stored in Salesforce after the document is created and is therefore available both in the file and as a value in a Salesforce field.
The following fields can and must be filled in the Calculation Request:
| Field name | Description |
|---|---|
| Name | The name of the calculation request data record. This is only required for internal differentiation between the various calculation requests. |
| Template | The template data record to which the calculation request applies is stored here. |
| Address | The address of the cell in which the value to be read is stored is stored here. |
| Field Name | Name of the field in Salesforce in which the value from the Excel table is to be stored. The field must be an existing field in the object referenced in the scope (see next line). |
| Scope | The scope containing the object in which the field from the 'Field Name' field exists. |
9. Merge Fields
In cloudworx.compose, a distinction must be made between merge fields that are used in the document itself and those that can be used in scopes and field automations.
9.1. Merge fields in the document
In the actual document, merge fields are used to map values from fields in Salesforce to the document. There are different rules for how merge fields must be inserted.
9.1.1. Merge fields in Microsoft Word
The syntax of the merge fields is based on the merge field logic of Microsoft Word (used, for example, when creating form letters).
A merge field is structured as follows:
{ MERGEFIELD ScopeName.Feldname \* MERGEFORMAT }MERGEFIELD: Defines that the data comes from an external source (here: Salesforce)
ScopeName: The name of the respective scope (e.g. "Customer_Account")
Field name: The API name of the object referenced in the scope (e.g. Name)
\*: This is a so-called field switch. It determines the format of the value output in Word.
Further information on merge fields: https://docs.aspose.com/words/net/fields-overview/
Please note:
In Word, a space is often automatically inserted after full stops. If this happens when entering merge fields, a full stop is inserted between the ScopeName and the field name, and the merge field cannot be read. The field cannot then be found and the merge field is not filled in when the document is created.
Example of a Use Case:
The parent scope references an account. The name of this parent scope is 'ParentAccount'.
A new Free Scope should now contain all contacts for this account. In the 'Query Filters' field, you must now restrict the scope so that only contacts assigned to the account are included. To do this, use the account ID, which you can obtain from the merge field as follows:
AccountId = '{!ParentAccount.Id}'When searching for the appropriate data records, the merge field is replaced by the account ID.
Please note:
The name of the data record is not Account, but the name of the scope (ParentAccount). This means that several different accounts can be referenced in a template.The merge field must be enclosed in single apostrophes, otherwise an error message will be displayed.
9.1.1.1. Adding a merge field
A merge field can be inserted by copying an existing merge field and pasting it at the desired location.
Alternatively, a new merge field can be inserted using the keyboard shortcut 'CTRL + F9'.
Please note:
In Word, merge fields are often not displayed in the editable view by default. Instead, only the label is displayed, which can be changed but is only a description of the merge field and has no influence on what the merge field actually contains. The label has angle brackets ( << … >> ) instead of curly brackets ( { MERGEFIELD … } ).You can switch between the label and the actual merge field content by right-clicking on it and selecting 'Field function on/off':

We recommend that whenever you edit a document, you always display all merge fields so that the content of the field function is displayed rather than the label.By default, the constant switching between label and field function can be set as follows (information refers to Office 365, version 2101).The following menu item must be activated:File → Options → Advanced → (Show document content) Show field functions instead of values
9.1.1.2. Inserting lists
Lists of scopes are transferred from Salesforce via list scopes and free scopes. In order to be able to read the data records from these scopes via merge fields, you must indicate in Word whether data from such a list scope or free scope should be displayed.
Both list scopes and free scopes have a 'Section Name' field. This field is used to define the list.
In Word, the list can then be called up using the following syntax. 'SectionName' is replaced by the name in the 'Section Name:' field in the respective list or free scope:
{MERGEFIELD TableStart:SectionName}The list must then be closed again:
{MERGEFIELD TableEnd:SectionName}Please note:
There must be no space between TableStart/TableEnd and the scope name.
The actual scopes can then be called between the two tags (TableStart/TableEnd). This is done in exactly the same way as for field scopes. All scopes in the list or free scope are inserted one after the other.
For example:
All contacts for an account should be listed in the document.
In this case, the Word template looks as follows:
 X
X
9.1.1.3. Insert IF condition
IF conditions can be used to display different values in a document based on conditions.
Here, a specific value (e.g. from a merge field) is checked and a result is displayed if the value fulfils a condition. If the condition is not fulfilled, a different value can be displayed.
This means that data from Salesforce can be used to display individual words, sentences or paragraphs, but images, other merge fields, entire tables or page breaks can also be displayed based on conditions.
The syntax for IF conditions is:
{ IF Wert1 = "Wert2" "WertWennBedingungZutrifft" "WertWennBedingungNICHTZutrifft" }Example with merge field inserted:
{ IF { MERGEFIELD Account.Status__c \* } = "Active" "Dieser Kunde ist ein aktiver Kunde" "Dies ist kein aktiver Kunde" }IF conditions can also be nested within each other to link certain content to conditions:
{ IF Wert1 = "Wert2" "WertWennBedingungZutrifft" "{ IF Wert1 = "Wert3" "WertWennBedingungZutrifft" "WertWennBedingungNICHTZutrifft" }" }Please note:
Text containing quotation marks (" ") can generally be inserted within an IF command, except within a list (see previous section). In this case, the text is inserted, but the special character "\" is also inserted.
Example:
{MERGEFIELD TableStart:SectionName}
{ IF { MERGEFIELD Account.Status__c \* } = "Active" "{ MERGEFIELD Account.Name \* }" "{ MERGEFIELD Account.Project_Name__c\* }" }
{MERGEFIELD TableEnd:SectionName}
The "Project_Name__c" field in Salesforce contains the value Munich "Project Digital". If the operation does not match, the following is displayed:
Munich \"Project Digital\"9.1.2. Merge fields in Microsoft Excel
Individual merge fields are created in Excel as follows:
&=ScopeName.FeldNameFor scopes that contain multiple data sets that are called via a section name, the following syntax must be used (note the three underscores):
&=templateSection.ScopeName___FeldNameThe following parameters, separated by commas, are possible here:
| Parameter | Description |
|---|---|
| noadd | Do not insert additional rows to balance data |
| skip:n | Skip a specified number (n) of rows for each row of data |
| ascending:n or descending:n | Sort files in merge fields in ascending or descending order. The data is sorted after the data source has been processed. |
| horizontal | Writes the data from left to right instead of from top to bottom |
| shift | Jump down or to the right to create extra rows/columns. The shift parameter works the same as in Microsoft Excel. |
| copystyle | Copies the format of the source cell to all cells in this column |
The parameters 'noadd' and 'skip' can be combined to insert data in alternating rows. Because the template is processed from bottom to top, 'noadd' should be added to the first line in this case to prevent additional rows from being added before the alternating row.
Example:
&=ScopeName.FeldName(skip:1,noadd)Please note:
Only one merge field can be inserted per cell in Excel. This means that multiple merge fields cannot be inserted one after the other (e.g. to display first name and last name one after the other). To do this, either two different cells must be filled next to each other, or the cells with the merge fields must be hidden and displayed in one cell using a formula.
9.2. Merge fields in field automations
In Field Automations, merge fields can be referenced in both the 'Condition Value' field and the 'New Value' field.
This allows both the condition and the new value of the field to be determined dynamically.
The syntax here is slightly different from that used for scopes: Since only merge fields from the scope specified in the field automation can be used in field automations, only the field name is required here:
{!Fieldname}Example of a Use Case:
After creating the document, we want to set the close date in the account (scope name: ParentAccount) to two weeks in the future, if it is not already one week in the future.
We have created two formula fields for this purpose:
CloseDatePlusOneWeek (date field that adds one week to the CloseDate)
CloseDatePlusTwoWeeks (date field that adds two weeks to the CloseDate)
The fields in Field Automation appear as follows:
 X
X
10. Create Documents
10.1. Create documents using button
A document can be created using a button in a data record and then saved in that data record.
Administrator rights are required to create a button.
In the setup, navigate to the desired object via the Object Manager and then to the page for creating a button via the menu item 'Buttons, links and actions' and the button 'New button/new link':
 X
X
In addition to the label and name of the button, the display type must also be selected. Here, 'Button for detail page' is selected. It would also be possible to create the document via a link.
A URL is entered as the content source. The URL has the following format:
/apex/cwcp__ccCreateDocument?id={!Account__c.Id}&outputs=pdf&template=cct0001
Three parameters are required:
| Parameter | Description |
|---|---|
| id | The Salesforce ID of the data record to be used as the starting point (i.e. for the primary scope). In this example, a button is created on the account, thus using a merge field for the account ID. |
| outputs | The name of the target format. If the target format is the same as the source format, enter "sameAsInput" here. |
| template | The cloudworx ID of the template. It is created automatically when a template record is created. |
Please note:
After creation, the button must be inserted into the page layout of the object.
10.2. Create documents using the process generator
Documents can also be created automatically via cloudworx.compose. This can be easily mapped using the process generator*.
Due to restrictions on the part of Salesforce, documents can only be created asynchronously here.
In our example, a document is created when the type is changed from 'Potential customer' to 'Customer' in the account.
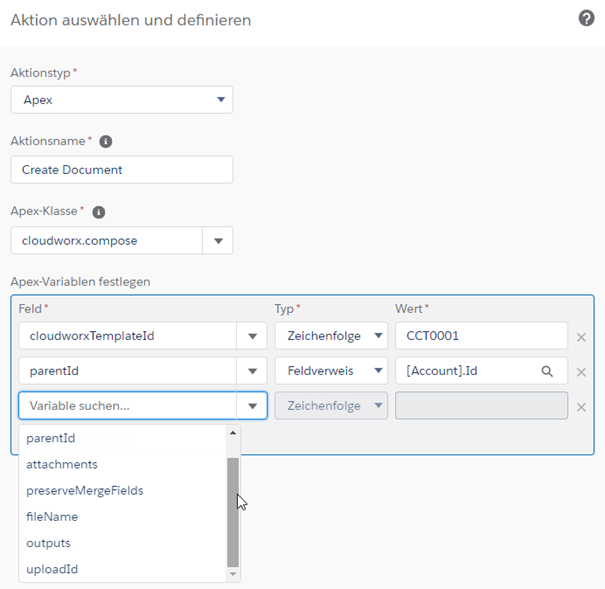
After creating the process and selecting the object, the condition is created first. Then cloudworx.compose can be defined via 'Execute action':
 X
X
The following parameters can be specified here:
| Parameter | Description |
|---|---|
| cloudworxTemplateId | Required field. The cloudworx ID of the template from the template data record |
| parentId | Required field. The Salesforce ID of the data record that is to be used as the starting point (i.e. for the primary scope). |
| attachments | Additional attachments can be added to the document here using the Salesforce ID (Attachment ID or ContentDocumentId). |
| preserveMergeFields | If this parameter is set to “TRUE”, merge fields that cannot be filled in are also displayed in the line file. |
| fileName | A name that differs from the name specified in the template can be entered here. |
| outputs | Required field. The target format is entered here (e.g. 'pdf'). If the target format is the same as the source format, enter 'sameAsInput'. |
| uploadId | A Salesforce ID that differs from the source data record (either as a fixed value or via a field reference) can be stored here. The target file is saved in the data record associated with the ID. |
11. Glossary
| Permission Set | A collection of extra permissions to extend a user's security settings on their profile. |
| Configuration | It contains the most important parameters that determine the core settings, such as authentication. It also displays general information and the configuration history. |
| Custom Object | An object that can be created later in Salesforce. Custom objects can be identified by the following abbreviation after the API name (the name used by the system): '--c' |
| Record | Data stored in an object. |
| Merge fields | A merge field is a placeholder that is filled with the value of a field when the document is created. |
| Lookup | A lookup is a field type in Salesforce. It establishes a relationship between two Salesforce objects. For example, there is a lookup to the account in the contact. |
| Object | An object corresponds to a category, similar to tables and columns in Excel. Examples of objects that are already created in Salesforce are accounts, contacts and opportunities. |
| Standard object | Object that is already included in the Salesforce delivery |
| Template | Predefined settings for quick document creation. |
| Related list | List of subordinate records for a parent record (e.g. all contacts, customer cases or opportunities for an account). |
| User | A user is someone who uses Salesforce. You can log in to Salesforce with a user name and password. Permission to view, create, edit or delete information can be granted to individual users or a group of users. |
Legal notice | Privacy Policy